생활 코딩 리액트 강의 https://www.youtube.com/playlist?list=PLuHgQVnccGMCRv6f8H9K5Xwsdyg4sFSdi
이벤트
props, state, event 3개가 상호작용하여 애플리케이션의 역동성을 만듦
이번 시간에 하고자 하는 역동적 이벤트:
[web, html, css, javascipt 단어에 링크를 거는 이벤트를 설치할 것임. 링크를 클릭하면 그에 따라서 App.js의 App 컴포넌트의 state가 바뀌고, 바뀐 state가 Content 컴포넌트의 props값으로 전달되면서 동적으로 애플리케이션으로 바뀌게 구현하기]
1.state 먼저 세팅하기
-
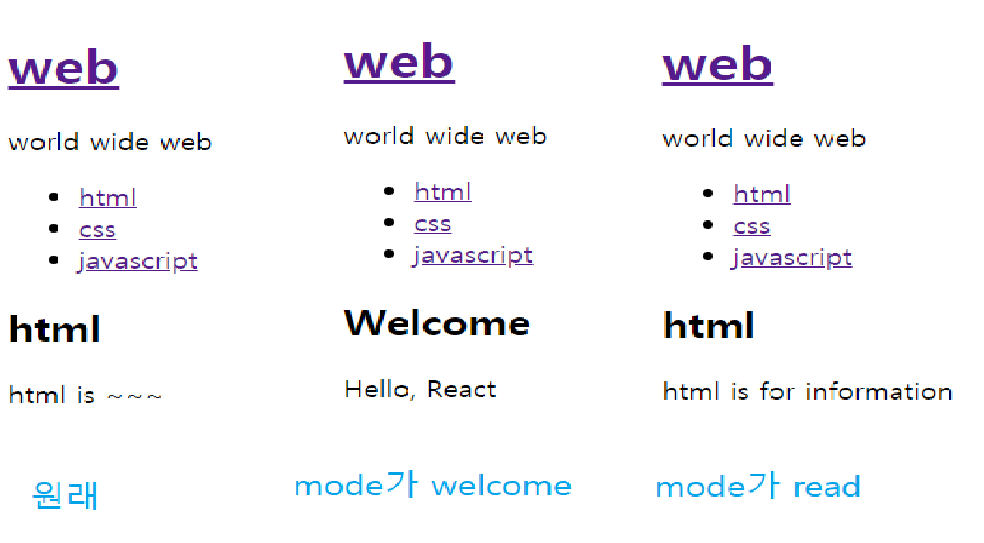
welcome 페이지인지, read 페이지인지 구분하기 위해 state에 mode라는 값을 줄 것임, mode가 welcome일 때 content에 표시할 텍스트도 정해줌
class App extends Component {
constructor(props){
  super(props);
  this.state={
    mode:'welcome',//welcome 페이지, read 페이지 구분
    subject:{title:'web', sub:'world wide web'},
    welcome:{title:'Welcome', desc:'Hello, React'}, //welcome mode일 때 content에 표시될 텍스트 지정
    contents:[
      {id:1, title:'html', desc:'html is for information'},
      {id:2, title:'css', desc:'css is for design'},
      {id:3, title:'javascript', desc:'javascript is for interactive'}
    ]
  }
}
~}
React 종특
props/state 값이 바뀌면, 그 props/state를 가지고 있는 컴포넌트의 render 함수가 다시 호출된다.
render 함수가 다시 호출됨에 따라서 render함수 하위에 있는 컴포넌트들의 render함수도 다시 호출된다
=> 화면이 다시 그려진다
render() 함수가 하는 일: 어떤 html을 그릴 것인가를 결정하는 함수
ex) mode 값에 따라 렌더링 결과가 다르게 render() 함수에 조건문 사용해보기 예제 코드
class App extends Component {
  constructor(props){
    super(props);
    this.state = {
      mode:'welcome',//welcome 페이지, read 페이지 구분 //밑에 if문에서 mode검사할 때 welcome 철자/대소문자 오타 조심
      subject:{title:'web', sub:'world wide web'},
      welcome:{title:'Welcome', desc:'Hello, React'}, //welcome mode일 때 content에 표시될 텍스트 지정
      contents:[
        {id:1, title:'html', desc:'html is for information'},
        생략
      ]
    }
  }
  render() {
    console.log('App render'); //render 호출되는지 로그 찍어보기
    var _title, _desc = null;
    if(this.state.mode === 'welcome') { //===3개인 거 오타 조심
      _title = this.state.welcome.title;
      _desc = this.state.welcome.desc;
    } else if(this.state.mode === 'read') {
      _title = this.state.contents[0].title;
      _desc = this.state.contents[0].desc;
    }
    return (
      생략
      <Content title={_title} desc={_desc}></Content>
      </div>
    );
  }
}
&& 컴포넌트마다 console.log('컴포넌트이름 render'); 이렇게 컴포넌트 이름 붙여서 로그 찍어보면
순서대로 log 출력되는 것을 알 수 있음

이번 시간에 하고자 하는 역동적 이벤트:
[위에서는 welcome/read 모드를 손으로 직접 써주었는데,,,, 클릭해서 바꿀 수 있다면 얼마나 좋을까???? 해보자!]
=
[web 버튼(subject 컴포넌트안의 href)을 클릭했을 때 subject 밖에 있는 app의 state를 바꾸기]
2.subject 안에 있는 것을 app에 도입하자
app.js 일부분
{/*<Subject
      title={this.state.subject.title}
      sub={this.state.subject.sub}>
      </Subject>
      위 코드는 기존에 있던 코드 (주석처리)
      subject.js에 있는 것을 가져와서 밑에다 씀. 여기에 이벤트 프로그래밍 할 것임*/}
      <header>
        <h1><a href="/">{this.state.subject.title}</a></h1>
        {this.state.subject.sub}
        </header>
3.app에 들어간 subject 부분에 이벤트 처리를 해보자
app.js 일부분
<header>
      {/*이름이 없는 밑의 사용자 정의 함수 => 링크를 클릭 시 실행되도록 약속되어 있음*/}
        <h1><a href="/"onClick={function() {
          alert('hi'); {/*이벤트 처리 부분*/}
        }}>{this.state.subject.title}</a></h1>
        {this.state.subject.sub}
        </header>
이렇게 이벤트 처리하면 문제점: 페이지가 리로드 됨. 리로드를 하지 않고도 역동적인 사이트를 만들 수 있는 리액트의 체면을 구기는 일임.
4.리로딩 없이 이벤트 처리를 해보자
(1) a 태그 쓰면 href 속성이 가리키고 있는 페이지로 이동한다 라는 기본적인 동작 방법이 있다. 이 동작 방법을 못하게 막으면 됨. (=그 페이지로 이동을 막아 리로딩을 없애보자)
onClick으로 이벤트를 설치해놓으면, 그 이벤트가 실행될 때(=저 함수가 호출될 때) (2) 리액트는 함수의 첫 번째 파라미터의 값으로 이벤트라고 하는 객체를 주입해주기로 약속되어 있음
위의 (1)과 (2)의 특징을 이용해서 리로딩 막는 코드
      <header>
      {/*이름이 없는 밑의 사용자 정의 함수 => 링크를 클릭 시 실행되도록 약속되어 있음*/}
        <h1><a href="/"onClick={function(e) {
          console.log(e); {/*이벤트 처리 부분*/}
          e.preventDefault();{/*a 태그의 기본적인 동작방법 금지해버리기*/}
        }}>{this.state.subject.title}</a></h1>
        {this.state.subject.sub}
        </header>
functione에 준 파라메터 e가 이벤트를 핸들링할 수 있게 주입된 정보.
e.preventDefault()는 이벤트가 발생한 태그의 기본적인 동작 방법을 막는 역할을 함. -> 바로 이 코드 때문에 페이지가 전환되지 않음.
debugger;
debugger가 쓰여져 있는 줄에서 실행을 멈추고, 개발자 도구의 Sources에서 다양한 정보를 얻을 수 있음
5.세팅해놓은 state와 이벤트 작업해놓은 것을 연결시키기
[read인 mode를 web 클릭 시 welcome으로 mode가 바뀌며 welcome 페이지가 출력되게]
- this.state.mode='welcome' 방법 (X)
직관적으로 생각해보면 밑에처럼 이벤트 처리하는 부분에 mode를 welcome으로 바꾸는 코드 한 줄 넣으면 될 것 같음 -> 근데 에러 남.
<header>
      {/*이름이 없는 밑의 사용자 정의 함수 => 링크를 클릭 시 실행되도록 약속되어 있음*/}
        <h1><a href="/"onClick={function(e) {
          console.log(e); {/*이벤트 처리 부분*/}
          e.preventDefault();{/*a 태그의 기본적인 동작방법 금지해버리기*/}
          this.state.mode='welcome'; {/*mode 바꾸는 부분*/}
        }}>{this.state.subject.title}</a></h1>
        {this.state.subject.sub}
        </header>
안 되는 이유:
이벤트가 호출될 때 실행되는 함수 안에서는 this의 값이 component 자기 자신을 가리키지 않고 아무 값도 세팅되어 있지 않음 그래서 아래와 같은 에러 메시지 발생 (말 그대로 state가 undefined 되어 있어 못 읽어온대)

- .bind(this) 방법 (X)
이벤트 프로그래밍 할 때 this를 찾을 수 없어 에러가 나면 -> 함수가 끝난 직후에 .bind(this) 해주기 -> 이렇게 해주면 this는 우리의 컴포넌트가 됨
근데 web 클릭해도 아무 변화 없음
<header>
      {/*이름이 없는 밑의 사용자 정의 함수 => 링크를 클릭 시 실행되도록 약속되어 있음*/}
        <h1><a href="/"onClick={function(e) {
          console.log(e); {/*이벤트 처리 부분*/}
          e.preventDefault();{/*a 태그의 기본적인 동작방법 금지해버리기*/}
          this.state.mode='welcome'; {/*mode 바꾸는 부분*/}
        }.bind(this)}>{this.state.subject.title}</a></h1>
        {this.state.subject.sub}
        </header>
안 되는 이유:
리액트는 state 값이 바뀐지 모르기 때문. 리액트가 원하는 대로/지정해놓은 방법대로 state 바꾸어 주어야 함
- this.setState({ mode:'welcome'}); 랑 .bind(this) 방법 (O)
<header>
      {/*이름이 없는 밑의 사용자 정의 함수 => 링크를 클릭 시 실행되도록 약속되어 있음*/}
        <h1><a href="/"onClick={function(e) {
          console.log(e); {/*이벤트 처리 부분*/}
          e.preventDefault();{/*a 태그의 기본적인 동작방법 금지해버리기*/}
          this.setState({
            mode:'welcome'
          }); {/*mode 바꾸는 부분*/}
        }.bind(this)}>{this.state.subject.title}</a></h1>
        {this.state.subject.sub}
        </header>
bind 함수 이해하기
this 값이 없을 때 강제로 주입하는 방법.
ex) 에러난 상황의 코드
var obj = {name:'egoing'};
function bindTest() {
    console.log(this.name);
}
bindTest();
ex) 해결 완료 코드
var obj = {name:'egoing'};
function bindTest() {
    console.log(this.name);
}
var bindTest2 = bindTest.bind(obj);
bindTest2();
//egoing 출력됨
5줄 코드 해석:
bind() 함수로 인해 bindTest() 함수의 블록 안에서의 (3번째 줄의) this는 obj가 됨. obj가 원래 아무 값도 안 가리키던 this에 주입된 것!
이렇게 bind()로 묶이게 되면 새로운 함수가 만들어짐
setState 함수 이해하기
직접 변경 불가. 함수의 형태로 state 값 변경해야 함.
app 컴포넌트가 생성될 때 최초로 가장 먼저 실행되는 constructor 에서는 편하게
  constructor(props){
    super(props);
    this.state = {
      mode:'read',//welcome 페이지, read 페이지 구분 //밑에 if문에서 mode검사할 때 welcome 철자/대소문자 오타 조심
      subject:{title:'web', sub:'world wide web'},
      welcome:{title:'Welcome', desc:'Hello, React'}, //welcome mode일 때 content에 표시될 텍스트 지정
      contents:[
        {id:1, title:'html', desc:'html is for information'},
        {id:2, title:'css', desc:'css is for design'},
        {id:3, title:'javascript', desc:'javascript is for interactive'}
      ]
    }
  }
이런 식으로 바꿔도 됨
하지만, 이미 컴포넌트가 생성이 끝난 뒤에 동적으로 state 값을 바꿀 때는 setState 함수
this.setState({
            mode:'welcome'
          });
를 사용해야 함.
'JAVASCRIPT > React' 카테고리의 다른 글
| [생활코딩 React 강의 4] CRUD 중 Create 구현하기 (0) | 2019.07.01 |
|---|---|
| [생활코딩 React 강의 5] 이벤트 설치해보기 응용 (0) | 2019.05.19 |
| [생활코딩 React 강의 3] State란? state 사용해보기 (0) | 2019.04.26 |
| [생활코딩 React 강의2] 컴포넌트 만들기, Props, 컴포넌트 파일로 쪼개기 (0) | 2019.04.26 |
| [생활코딩 React 강의 1] 컴포넌트란? && React 기본 앱 뜯어보기 && 배포해보기 (0) | 2019.04.24 |


Comments